


- Tuning and optimization
- Deletion of hyphenation
- Setup for Word 2003
- Word 2007 and 2010
- Add soft transfer
- Put hyphenation in parts of the document
- Add a non-breaking hyphen
- Set the transfer zone
The transfer of words is required when typing books, magazines, booklets, as well as documents of special formats. But do not manually insert a hyphen in necessary place , because when formatting text, you can spoil the entire document. AT Word editor there is a special tool for this.
When typing, do the following :
- Open the finished document.
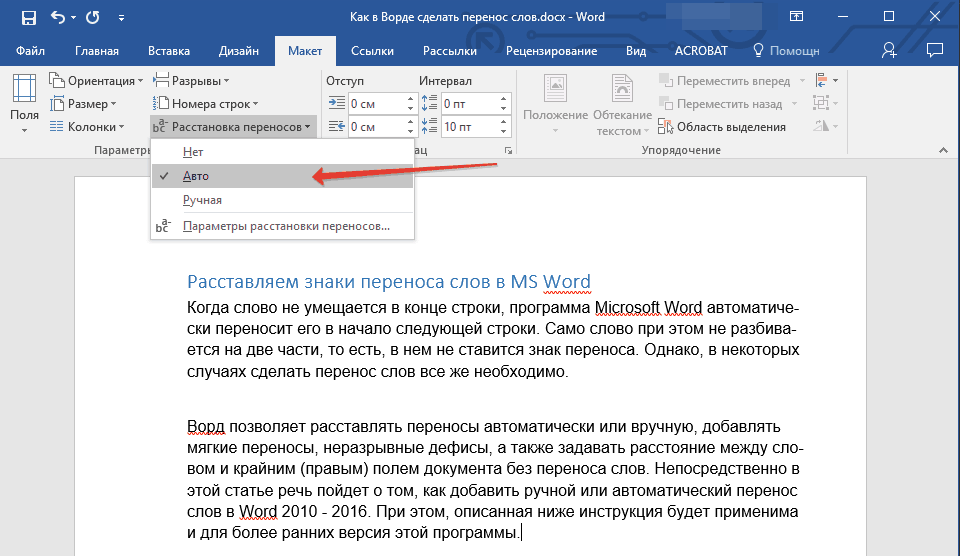
- On top bar Select the “ Page Layout ” tab.
- Click on the menu "Hyphenation" and select one of two modes.
In automatic mode, the program itself breaks words, guided by the rules of the Russian language. It can be included even before the work on the document begins, and then it will be formatted automatically by the editor.
Manual mode prompts the user to determine the location of the breakdown. This may be necessary if in the text there are special terms, jargon and other words that the program may transfer incorrectly.
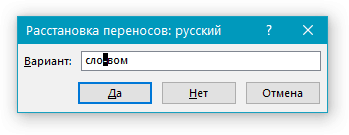
If manual placement is selected, a dialog box will appear on the screen offering options. 
Tuning and optimization
By default, the words will be transferred at the end of each line. If this feature is undesirable, you can adjust the frequency of use. To do this, we find in the “ Arrangement of hyphenation ” menu item “ Parameters ” and in the appeared window specify the necessary number, defining how many hyphenation can be arranged in a row in several lines. 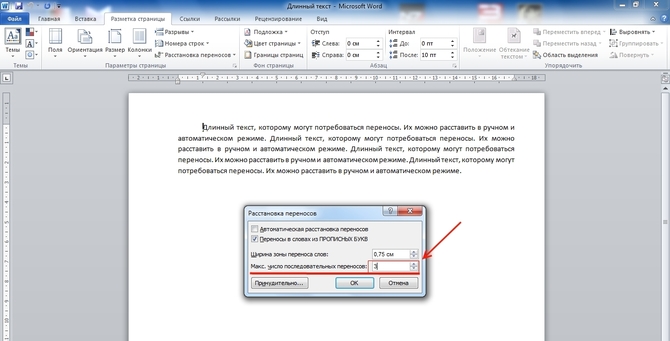
In the field “ Width of the word wrap ” you can specify the distance between the last word in the line and the right edge of the page. By increasing this parameter, you can reduce the number of hyphenation, but with a narrower interval of the end of lines in the text will become smoother.
If there are several paragraphs in which words should not be moved, you can disable this feature for a text fragment. The algorithm is as follows:
If the document contains a word with a hyphen (for example, “sci-fi”) that cannot be broken, you should insert an inseparable instead of the usual hyphen by holding the Ctrl + Shift + hyphen (-) buttons.
Deletion of hyphenation
To cancel the automatic placement, you just need to click " No " in the mode selection menu. 
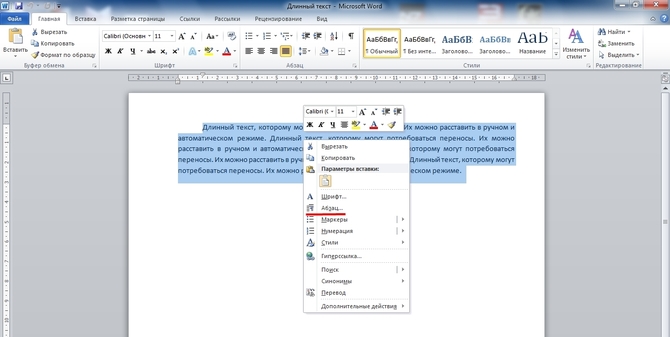
WITH manual input it is more difficult, because it will also have to be removed manually. This is done in the following sequence:
- On the menu bar, select the tab " Home ".
- On the right we find the item " Replace ".
- In the window that opens, we do not fill in any fields. Just click on the " More >>" button.
- At the bottom select the panel " Special ".
- We find in the list " Soft transfer ".
- Click on " Replace All ".
In all existing versions editors Microsoft Word By default, a word that does not fit on the entire line moves to the next. Meanwhile, the hyphenation allows you to improve the layout of the text, avoiding gaping voids, to make the document more accurate. In addition, the additional compactness of the text affects the consumption of paper for the printer.
At the same time, finding such an important and useful function while wandering around the menu can be quite difficult. Also in versions of Microsoft Office different years interface graphic editor time after time it changes beyond recognition, which makes it not a simple task to search for the usual functionality. Consider the hyphenation algorithm for versions of Word 2003, 2007, 2010.
Setup for Word 2003
Service -> Language -> Hyphenation (hereinafter - RP)
In order to transfer words by word in the already typed text, it is necessary to select it entirely or the necessary fragment. Then select the menu “Service”, the item “Language” and the command “RP”. We get to the settings window. Here it is necessary to put a marker in front of the “Automatic RP” command. Below you can set the necessary parameters auto function . For example, the absence of a marker in front of the “Transfer in words from CARDWARE” command will exclude the breakdown of abbreviations and capitals. Appearance The text can be further improved by adjusting the parameters “Width of the word wrap” (this is the maximum allowable distance between the right margin and the last character on the line) and “Maximum number of consecutive hyphens” (ability to control the number of worn words per page). After the parameters are changed or selected by default, you must click "OK" to start the automatic hyphenation.
The ability to select transferable words manually according to the 2003 version is hidden in the same window behind the “Forced” button. By choosing this command, you will decide in the opened dialog box how to divide a word by syllables.
Sometimes it happens that part of the text needs to get rid of autotransfer. You can do it this way. Highlight desired fragment and in the "Format" menu, select "Paragraph", and in the opened window, select the "Position on Page" tab. Check the box next to the line "Prohibit automatic transfer words. " The command will be applied only to the words of the selected fragment.
Word 2007 and 2010
Page Layout → Hyphenation-> No, Auto, Manual, In Word 2007 and 2010 versions, the TL function is located in the Page Layout tab. The editor makes it possible to arrange hyphens using the auto mode (the “Auto” item) or perform an operation with one's own hand (“Manual”), defining independently which part of the word remains on the line, and which moves to the next. The division of words into syllables is carried out in a dialog box.
The "Parameters of the RP" command allows you to enable the settings at your discretion. automatic mode . This can be done by the same parameters, which are decoded above for Word 2003.
In the 2003 edition, the option to enable hyphenation is located in the same window, which can be called up using the Tools | Language | Hyphenation command. In this case, the Hyphenation window will appear, in which you need to enable the (set the bird) option. Auto Hyphenation . Perhaps the option Transfers in words from CAPITAL LETTERS can also be left, although sometimes in capital letters, hyphens are not put.
Hyphenation in Word 2007 and Word 2010.
To enable hyphenation in later versions Word, you need to go to the Page Layout tab and in the Page Setup area select the Hyphenation command.
This command has nested clauses:
No - this mode is on by default. Words that do not fit on the line will be transferred entirely to the next line.
Auto - the command to enable automatic hyphenation. If you select this command, words that do not fit in the string will be transferred in accordance with the rules introduced in Microsoft Word.
Manual - this command opens the Hyphenation dialog box, which allows you to manually arrange hyphens in words that do not fit at the end of the line.
Hyphenation settings - opens the Hyphenation dialog box, which allows you to configure the hyphenation settings. This option brings up the same options window as in Word 2003.
The search and replace text function not only speeds up the editing process, but can also be useful when searching for and replacing certain formatting options, special characters and other document objects.
Search
To perform a search, you must select the command "Edit" - "Find" (Ctrl + F). At the same time, the search and replace dialog box will be displayed on the screen.
In the "Find" field, you must enter a pattern for the search. To start the search, click the "Find Next" button. Word will search the specified pattern from the position where the cursor is located towards the end of the document. If the necessary text fragment is found, the search is paused, and the found text is highlighted. To continue the search, you must click the "Find Next" button again. When the end of the document is reached, Word informs it and offers to continue the search from the beginning of the document. If there is no need for further search, then you need to click the "Cancel" button.
Replacement
To perform a search and replace text, select the "Edit" - "Replace" command (Ctrl + H). At the same time, the search and replace dialog box will be displayed on the screen.
In the field "Find" you must enter a piece of text to be replaced. In the "Replace with" field - the text to be inserted. To start the replacement, click the "Find Next" button. Word will find the first piece of text to be replaced and highlight it. To replace, you must click "Replace". If you are sure that the replacement is correct and there is no need to control this process, then you can click on the "Replace All" button. In this case, all found fragments will be replaced and at the end of the operation Word will provide a report on the number of replacements made.
It should be very careful when replacing text. For example, typing the word "bank" to replace the text, Word will make a replacement in all the words where this phrase occurs (Privatbank, ATM, All-In, etc.).
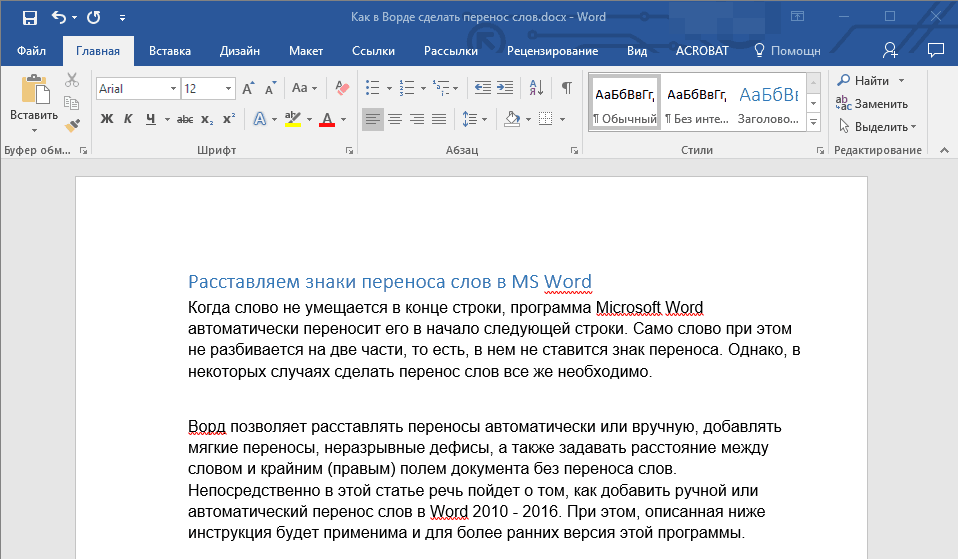
When a word does not fit at the end of a single line, Microsoft program Word automatically takes it to the beginning of the next. The word itself is not divided into two parts, that is, there is no hyphenation in it. However, in some cases, the transfer of words is still necessary.
Word allows you to arrange hyphenation automatically or manually, add characters of soft hyphens and non-breaking hyphens. In addition, there is the ability to set the allowable distance between words and the extreme (right) field of the document without word wrap.
Note: In this article it will go on how to add manual and automatic word wrap in Word 2010 - 2016. In this case, the instruction described below will be applicable for earlier versions of this program.
The automatic transfer function allows you to place hyphens in the course of writing text where necessary. Also, it can be applied to previously written text.
Note: On subsequent changes to the text or its change, which may well entail a change in the length of the line, automatic word wrap will be re-arranged.
1. Select the part of the text in which you want to arrange the hyphenation or do not select anything, if the hyphenation signs should be placed throughout the document.
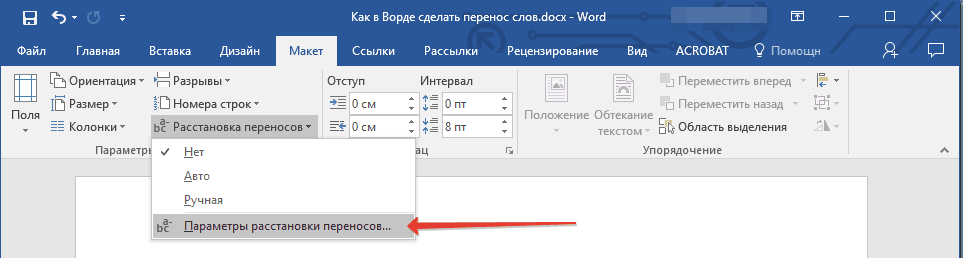
2. Go to the “Layout” tab and click on the “Hyphenation” button located in the “Page Setup” group.
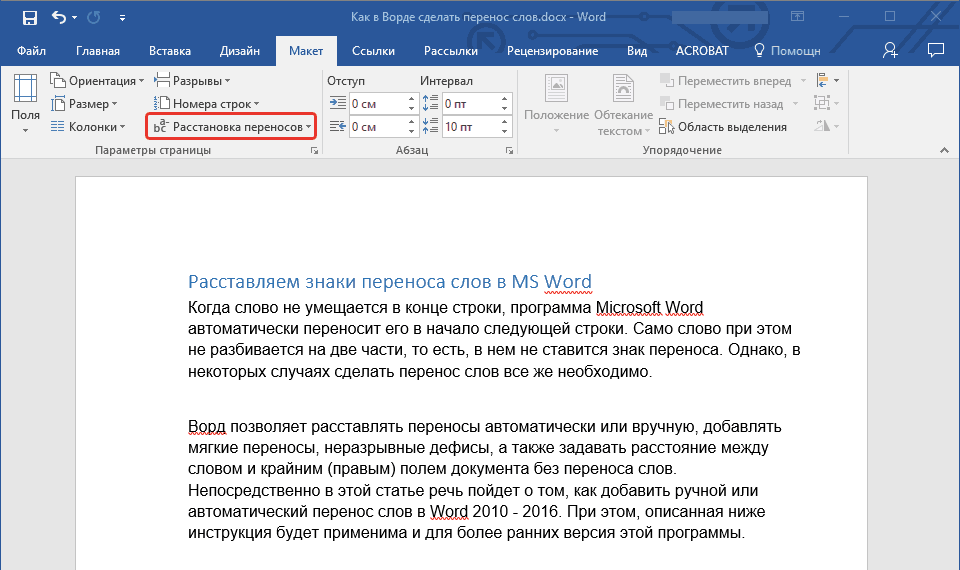
3. In the drop-down menu, check the box next to “Auto” .
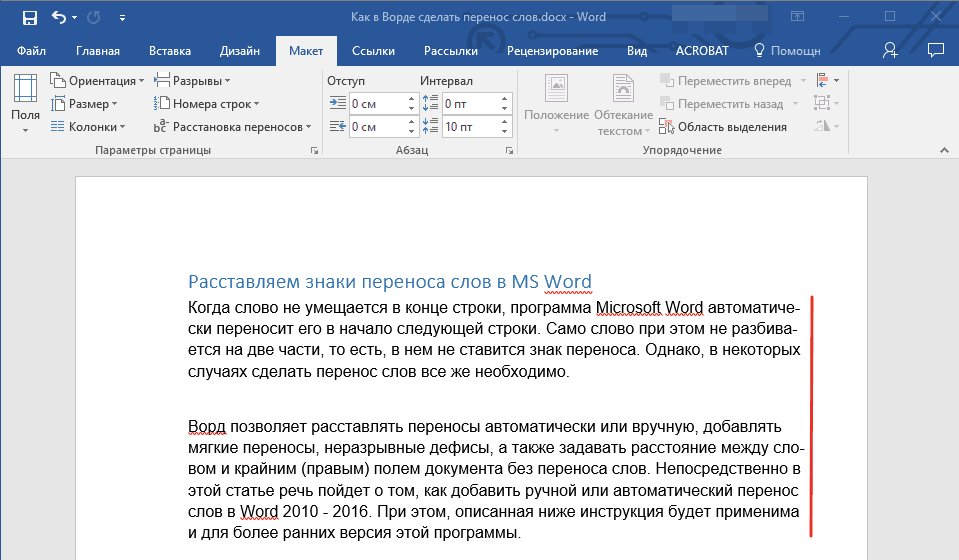
4. Where necessary, automatic word wrap will appear in the text.
Add soft transfer
When it becomes necessary to indicate a word or phrase break that falls into the end of the line, it is recommended to use soft carry . With it, you can specify, for example, that the word “autoformat” needs to be moved “auto-format” and not “autoformat” .
Note: If a word with a soft hyphen set in it is not located at the end of the line, then the hyphen character can only be seen in the “Display” mode.
1. In the “Paragraph” group located in the “Home” tab , find and click “Display all characters” .
![]()
2. Click the left mouse button in the place of the word where you want to put a soft hyphen.
3. Press “Ctrl + - (hyphen)” .
4. A soft hyphen appears in the word.
![]()
Put hyphenation in parts of the document
1. Select the part of the document in which you want to put the hyphenation.
![]()
2. Go to the “Layout” tab and click on “Hyphenation” ( “Page Setup” group) and select “Auto” .
![]()
3. In the selected text you will see automatic hyphenation.
Sometimes it is necessary to arrange hyphenation in parts of the text manually. Thus, the correct manual hyphenation in Word 2007 - 2016 is possible due to the ability of the program to independently find words that can be transferred. After the user specifies the place in which to place the transfer, the program will add a soft transfer there.
When you further edit the text, as when changing the length of lines, Word will display and print only those hyphens that are at the end of lines. At the same time, repeated automatic hyphenation in words is not performed.
1. Select the part of the text in which you want to arrange the hyphenation.
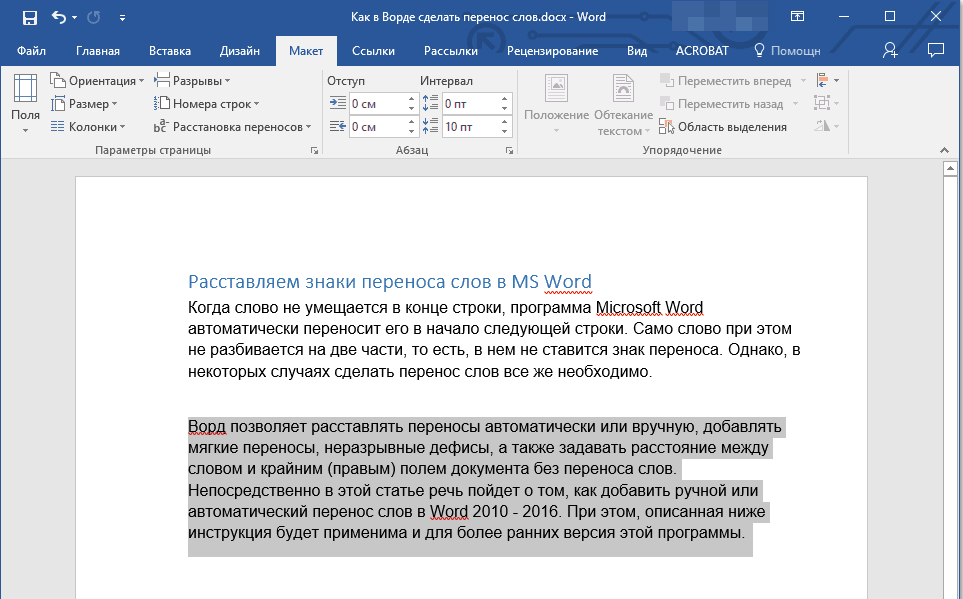
2. Go to the “Layout” tab and click on the “Hyphenation” button located in the “Page Setup” group.
3. In the expanded menu, select “Manual” .
![]()
4. The program will search for words that can be transferred and will show the result in a small dialog box.
- If you want to add a soft transfer in the place proposed by the Word, click “Yes” .
- If you want to set the hyphenation symbol in another part of the word, place the cursor there and press “Yes” .
Add a non-breaking hyphen
Sometimes it is necessary to prevent breaking words, phrases or numbers at the end of a line and containing a hyphen. Thus, for example, you can eliminate the gap phone number “777-123-456”, it will be fully transferred to the beginning of the next line.
1. Position the cursor where you want to add a non-breaking hyphen.
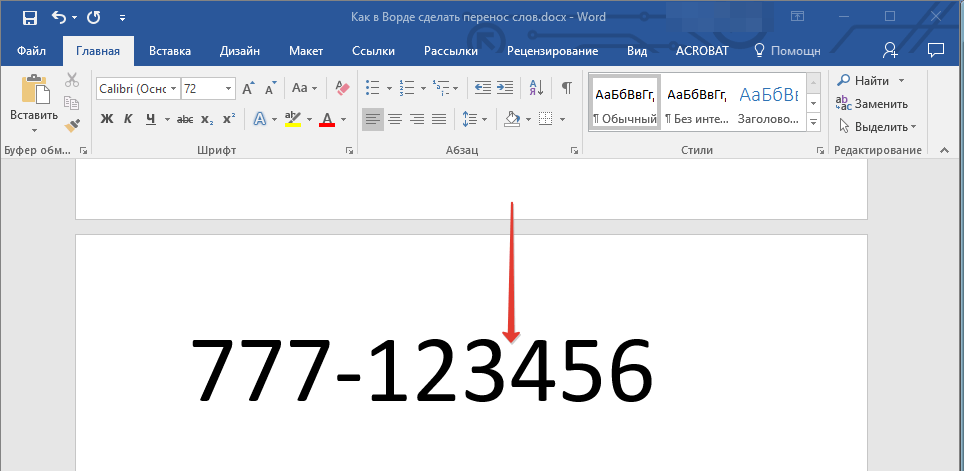
2. Press the “Ctrl + Shift + - (hyphen)” keys.
3. The continuous hyphen will be added to the location you specified.
![]()
Set the transfer zone
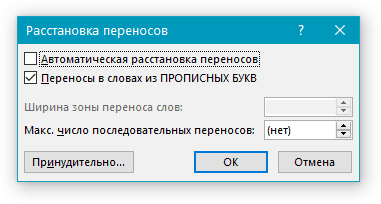
The transfer zone is the maximum allowable interval that is possible in Word between a word and the right margin of a sheet without a transfer sign. This zone can be both expanded and narrowed.
To reduce the number of transfers, you can make the transfer zone wider. If it is necessary to minimize the roughness of the edge, the transfer zone can and should be made narrower.
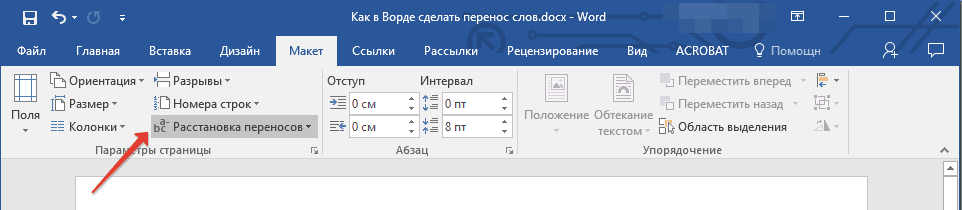
1. In the “Layout” tab, click the “Hyphenation” button located in the “Page settings” group, select “Hyphenation settings” .
2. In the dialog box that appears, set the desired value.
That's all, now you know how to arrange hyphenation in Word 2010-2016, as well as more early versions this program. We wish you high productivity and only positive results.
Setting AutoSave in Word
Word autosave is quite useful feature . Especially if you often have to work with text, and the computer is connected to the mains directly, without a block uninterruptible power supply . Personally, it saved me many times.
By default, Word automatically saves open documents every 10 minutes in the folder "C: \ Users \ Folder_current_user \ AppData \ Roaming \ Microsoft \ Word \". If the computer suddenly turned off, the next time you open Word programs the user will be prompted to open the saved copies, or delete them if there is no need for them.
The above parameters can be changed by forcing the computer to auto-save in any other folder, as well as by increasing or decreasing its frequency. I find it difficult to think of an example when it may be needed, but Word autosave can be turned off if you wish.
How to copy drawing from Word document
As you know, in the text editor Microsoft Word is convenient to work with the text. For clarity, in text documents You can insert pictures. Almost all users can do it.
At the same time, not many people know how to extract pictures from a Word document and save them as separate images, since the corresponding tools are missing from this text editor.
How to turn on the line in Word
In the text editor Microsoft Word on the left and top edges A window usually displays a ruler. With its help it is very convenient to change the borders of the text in the document.
It happens that this line for some reason disappears. This causes inconvenience when working with the program. To return it into place, just a few mouse clicks. However, many inexperienced users do not know exactly how this can be done.
How to number pages in Word
Often I am asked a question about how the pagination in Word is activated.
Despite the relative simplicity of solving this problem, not only can set and remove numbers of co pages inexperienced users , but also many people with a sufficient level of training.
How to simultaneously open different pages Word document
Not all users know that the text editor Microsoft Word provides the ability to simultaneously edit the same document in several windows.
This is very convenient if, for example, you need to compare or agree on the information at the beginning and at the end of large document . The document can be opened in two windows, one of which will display its beginning, and the other - the end. In this case, the page does not have to constantly scroll. It will be enough just to switch to the appropriate window. In each of these windows, the document can not only be viewed, but also corrected. The number of windows in which you can work with one document is not limited.
How to put a password on a Word document
Many of us need to protect text files password. It does not matter what these files contain. The main thing is to set the password quickly and outsiders could not open them.
The well-known text is capable of solving this problem. Microsoft editor Word, which is present on most office and home computers. It allows you to set passwords for files of all supported formats (doc, docx, rtf, etc.).
In different versions of word the order necessary actions is different. Here you will find recommendations for Word 2010 and older versions.
Similar articles