


- User Reviews
- Step 1. Download software on PC
- Step 5. We print the calendar
- Instruction
- Cancel hotfix patches
- AutoCorrect replacement
New program "Design Calendars" allows you to create stylish calendars of any format and style. Size distribution - 48 Mb. The program works under all windows versions , including Windows 7, XP, Vista, Windows 8 and 10. Purchase full version produced through the most reliable online stores with delivery in 10 minutes.
User Reviews
For a long time I chose a suitable program for creating calendars. When I tried Design Calendars, I immediately understood - this is what I need. The program has everything that can be useful for making calendars at home!
Alyona Morozova, Moscow
Design Calendars - very high quality and thoughtful program. Undoubtedly, the best in the Russian market. She personally struck me with a variety of calendars and virtually unlimited design possibilities.
Vyacheslav Titov, Khabarovsk
How to create a calendar with your own hands? If you are asking this question not for the first time, then it’s time to find the answer. This article will contribute to this. After reading it, you will learn how to make wall, table, pocket, flip and other types of calendars right behind your computer using the convenient “Calendar Design” program -
Step 1. Download software on PC
Step 5. We print the calendar
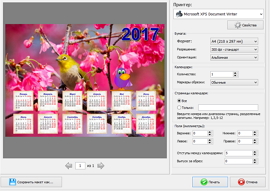
Now you know how to create a calendar. Not completely finished project can be left for further work on the computer: to do this, click on the "Save" button in the menu at the top. There you can save it as an image in PDF, JPEG, CMYK, etc. If the calendar is ready, then it's time to print it. Click on the option "Print". In the window that appears, select the printer, paper size and orientation, set the markers for trimming, margins and the number of calendars and click "Print . "
In this article you will learn how to make a calendar in Word for 2014 and can download ready-made templates ().
Modern office worker is not a problem to get a beautiful and functional calendar. Often they are brought and donated to New Year customers, customers or thankful visitors. In addition, no problem to buy a calendar for 2014 in the nearest kiosk.
What to do to those who did not have time to get a calendar or he did not get the beautiful. You just need to turn to the computer. Almost every computer in Russia is worth text editor Microsoft Office, which means you can make a calendar right in the Word.
Run the program, select the menu File | Create ...
On the right side there is a sidebar for creating a document.
In the "Creating a document using a template" section, click on the "General templates ..." item.
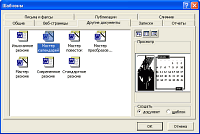 In the “Templates” dialog that appears, open the “Other Documents” tab and select the “Calendar Wizard” item. Click OK to continue. If the calendar component is not yet installed, the program will install it itself.
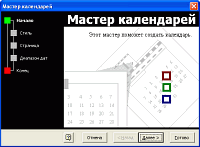 On the first page of the Calendar Wizard, click Next.
 Choose a calendar design style: Strict, Standard, or Exquisite. In appearance, you can guess how the calendar will look.
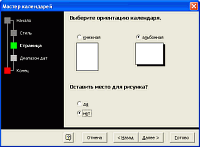 Select the orientation of the calendar and the presence of a picture. With a picture, the finished document will look a bit more elegant, especially if you print it on a color printer.
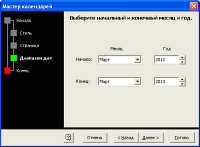 Select the starting and ending month and year. By default, the current month and year 2013 are selected. I recommend immediately printing a calendar for a year — select the next 2014 year.
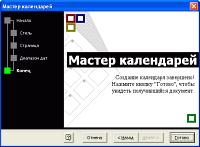 Creating a calendar is complete! Click “Finish” to see the resulting document.
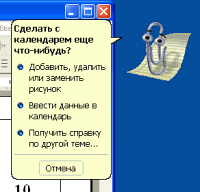 Next assistant Microsoft Word (in this case, Skrepysh) will offer his help. You can read the help on changing the finished calendar - how to add, delete or change a picture or add data to the calendar.
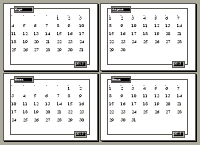 Everything, you can print a ready-made calendar for 2014 from Microsoft Word, and if you don’t like it, you can create a new one at any time. Unfortunately, the calendar does not highlight the output and holidays but you can do it yourself, especially if you have a color printer.
Below you can download ready-made calendar templates, so as not to waste time creating them.
Download templates (6 pieces, 1.1 MB)
Microsoft Word is a powerful tool for creating text documents . With it, you can create a small convenient calendar that can be called up by pressing the corresponding button in the toolbar. To do this, you will need to use the Microsoft Visual Basic Toolkit, which is installed with any Microsoft Office package.
Instruction
Create Word document and save it as a template. To do this, use the appropriate menu items "File" (for Office 2007 and above - the Microsoft Office button in the upper left corner) - "Create" - "Empty Document", and then "Save As" - "Word Template".
Open the Visual Basic programming environment by pressing the Alt and F11 keys. An editor window opens in which you press the “F7” key.
In the upper part of the window, select “Insert” - “User Form” (“Insert -“ User Form ”). Select the Tools menu - Additional Controls. In the pop-up menu, check the box next to “Calendar Control” (or “Calendar Control). Click OK.
Click on the “Calendar” icon that appears in the “Toolbox” control panel. Move the mouse over the form and draw a square of the size required for the calendar.
You can change the display options of the calendar. To do this, on the left side of the window, in the Properties menu, select “Custom” and click on the ellipsis button on the right side of the line. In the pop-up window, select the required settings. In the tab "Font" and "Color" you can select the options for the calendar panel itself. After making all the settings, click "OK".
Click on the form header, and in the “Properties” (“Caption” line) you can specify the name “Calendar”. The title will change.
To organize the closing of the calendar on the "Esc" key. To do this, select the button “CommandButton” in the ToolBox, draw it. Change the value in the “Properties” to “True”. Press F7, enter “Unload Me” between the two lines “Private Sub ..” and “End Sub”, then click “OK”.
To display the current date in the calendar, paste the code after the item “Private Sub Calendar1_Click ()”: Private Sub UserForm_Initialize ()
Calendar1.Today
End sub
To display the calendar in any document created on the template, select the “Insert” - “Module” command, and enter: Sub OpenCalendar ()
UserForm1.Show
End sub
Click the “Save” button on the toolbar (or “File” - “Save”). You can close the editor.
To test the health, press Alt and F8 in Word. Enter "OpenCalendar", click "Run." A calendar will open. Save the created template.
Helpful advice
To simplify the calendar output, you can add it to the toolbar (“Service” - “Settings” - “Toolbar” tab - “New” button).
The AutoCorrect function on the fly corrects hundreds of common typos and misspelled words in MS Word. We'll have to follow closely to see this quick replacement.
For example, in Word you cannot enter the word nelz (without a soft sign) . This is due to the fact that AutoCorrect in Word instantly corrects this typo after you press the spacebar.
AutoCorrect can also convert basic text combinations to the desired characters. For example, try to write (C), and auto-change will turn it into one copyright symbol ©. The same goes for entering a combination ™ that turns into ™. Entering the characters -> turns them into arrows, and the characters см become a smiley.
In addition to the spelling auto-replacement corrects the main punctuation errors in your words. This function automatically makes the first letter of the sentence in upper case, automatically corrects the inverted upper case, as well as other common errors.
Cancel hotfix patches
You can undo changes made on the fly by the AutoCorrect function, but this will require speed. The secret move is to press the Ctrl + Z combination (Undo command) right after the autochange. Clicking cancels the action of the AutoCorrect.
Even if you did not use the Undo command promptly, you can still view the edits made by the AutoCorrect. They are marked with a blue rectangle located under the first letter of the corrected text, as shown in the figure below. To do this, set the cursor on this rectangle and click on it to see the various options for autochange.
AutoCorrect replacement
To bring the text into its original form, select the option "Change back to ...", where "..." is the source text.
To prevent this type of autochange, select the "Disable automatic change ..." option. In this case, the text will not be subject to autochange, but will be defined as a typo or a word with an error.
In order to control the behavior of autochange, as well as to correct and expand the list of words for replacement, you must perform the following steps:
- Select the File tab in the main menu.
- Click Options. The Word Options dialog box appears.
- Click on the Spelling category in the left pane.
- Click the AutoCorrect Options button.
A dialog box appears with the AutoCorrect tab activated. This tab contains a list of all substitutions, as well as a list of corrections for common typos. Through this tab, you can also remove all autocorrect options that do not suit you. 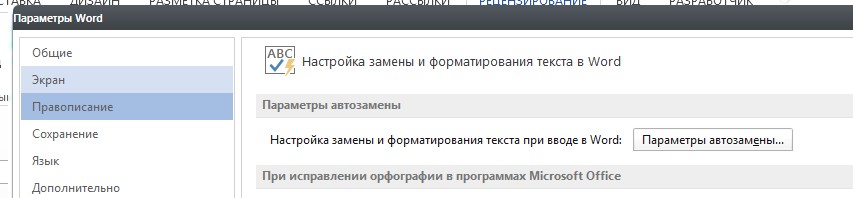
To delete an entry in the AutoCorrect list, find the required line, for example, 🙂 for a smiley. Select a line and click the Delete button.
To add an entry to the auto-replace list, use the “replace” and “by” fields. For example, type "strong" in the "replace" field, and in the "on" box, type "strongly", then click the Add button. After making all the changes, click OK and close the Word Options dialog box. 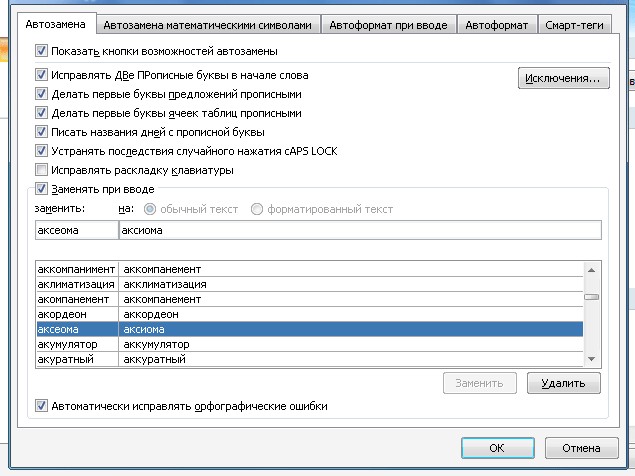
AutoCorrect is one of many features in Word. I hope after reading you it became clear how this convenient error correction method works when working with documents.
If I helped you, share this post with others. social buttons . You are not difficult - I am pleased. And to always be aware of new issues - subscribe to the newsletter and join the groups: Classmates, vKontakte.