


- How to create a table in MS Word
- How to create a table in MS Excel
- Option 1. Table in one click.
- Option 2. Draw - easy!
- Option 3. And a little more about Word 2013 tables ...
- PS
By default, WordPad word processing program is installed in any windows version . It is very simple, convenient, but has limited functions of formatting, design design. In particular, WordPad lacks the ability to create a table, although it can be imported from a “friendly” program and edited.
Launch WordPad via “Start” by selecting “All Programs” → “Accessories”. Put the cursor where you want to create the table. You can import a table, for example, from Excel, Microsoft Works. Select “Insert” → “Object” in the top panel. A window will appear, in its left part you need to put a mark against the words "Create a new". Next to the “Object type” window, specify the program in which the table will be created (for example, Excel).
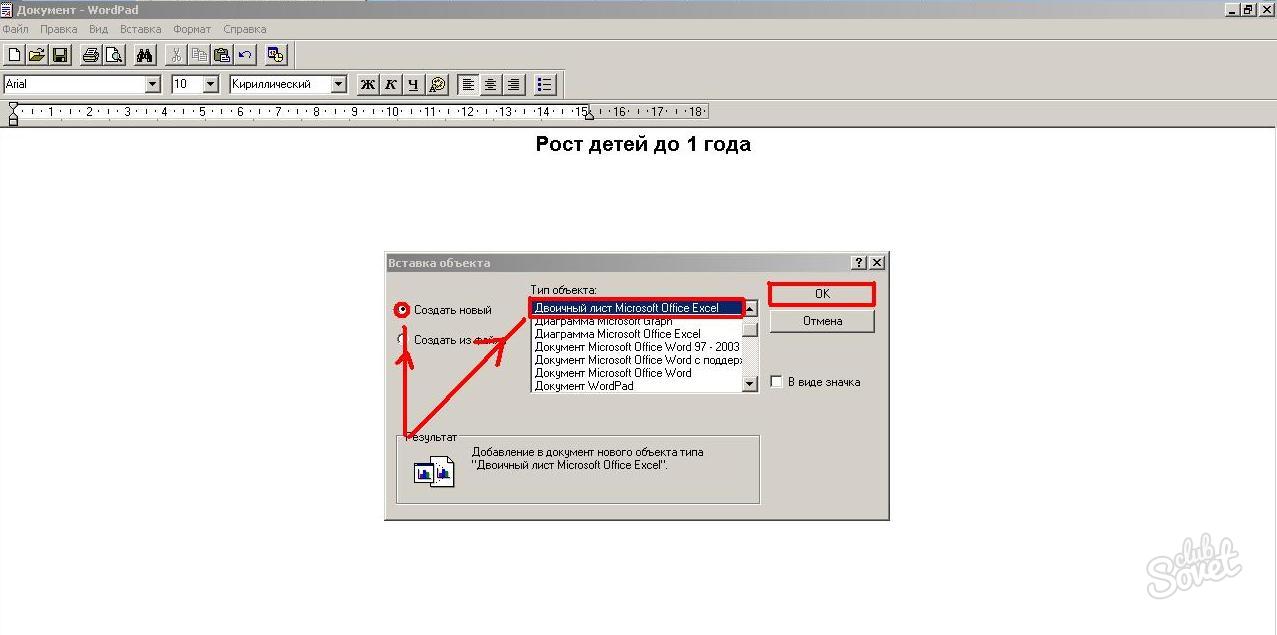
A window of the specified document type will be opened in which the required table should be created. For the header, you can combine the cells by clicking on a special button (first select them with the mouse).

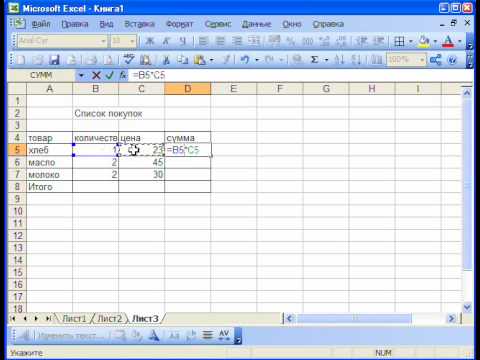
You can change the color, style, font size, fill, align text - perform all the actions available in Excel. To leave the edit window, double click on the empty field. And to change the data, follow the same steps on the table.

So, creating a table in WordPad fails, but importing it is easy and simple. All the functionality of the editor in which the table will be created is available.
How to create a table?
When working with documents, the need to insert a table in the text or create a spreadsheet for the calculations occurs very often. Despite this, the question “How to create a table?” Remains relevant for many users. Microsoft program Office allows you to create tables in several of your applications.
How to create a table in MS Word
AT text file Tables give information visibility, allow you to sort the data by the desired parameter. In the table, you can set the required number of rows and columns, perform actions with its cells (delete, merge, adjust the size), insert text, pictures, charts into cells.
Before you create a table, decide on the required number of rows and columns. Then follow the simple steps below:
- set the cursor to the desired place;
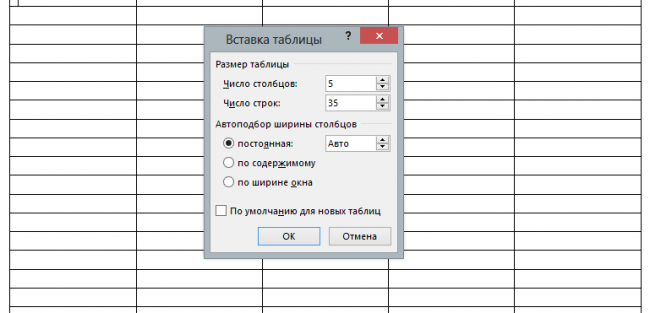
- consecutively click Table - Insert - Table;
- in the Insert Table window, specify the required number of rows and columns;
- In the lower part of the window, you can adjust the width of the columns, the default is a fixed width;
- Click Ok and the table will be inserted into the document.
In a text editor, you can also make drawn tables. ? After clicking the buttons Table - Draw a table, the cursor will take the form of a pencil, and it remains only to draw a table of the desired size and break it into rows and columns. This option is useful for creating a complex table.
How to create a table in MS Excel
MS Excel is designed to create tables directly and perform mathematical calculations in them. The workspace of the sheet is a table with an unlimited number of cells.
The first line usually makes a table header. This is the main stage of the creation of the table, since due to the incorrect compilation of the header, it is necessary to redo the table entirely. If the item names do not fit in the cells, their width can be increased by dragging the line separating the columns. The row height can be adjusted in the same way. To make the cap stand out from the table, you can change the font or mark the cap with a different color.
After drawing up the caps, you can begin to fill in the table. Note that the table cells on the print will not have dividing borders. To mark them, you need to select the table, from the context menu of the right mouse button, select the item "Format cells". In the window that opens, on the "Border" tab, you can designate external, internal borders, indicate the thickness and type of dividing lines.
By exporting a table from MS Excel, you can also use MS Word. To do this, on the top menu bar, click Insert - Object - Microsoft Sheet Excel.
Text editor Word is good not only for creating texts, but also for inserting and drawing tables. Tables may be needed for completely different needs, but on the whole they have one task - to systematize information, so to speak, to put everything in order. In the case of Word, these will not be shelves, but columns and lines. So here we go.
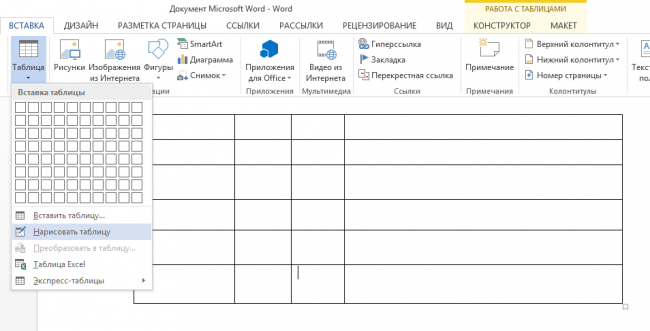
Option 1. Table in one click.
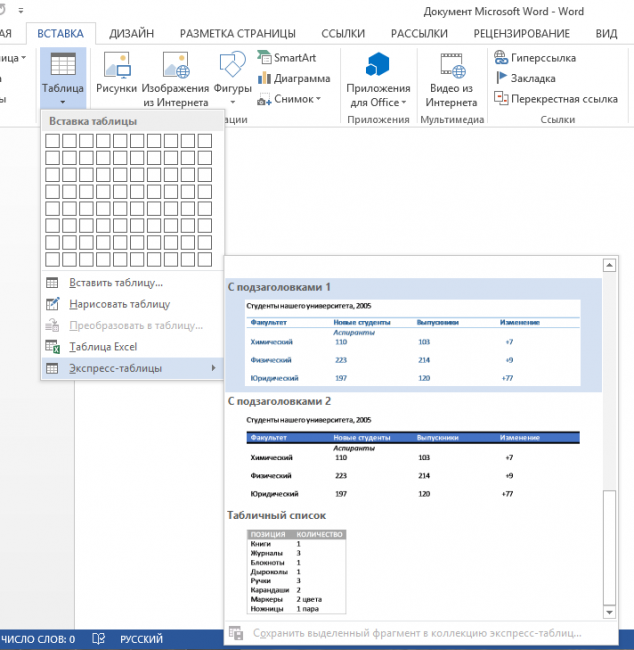
In the upper horizontal menu of the document tools, select the "Insert" item, then "Table". When you click on the "Table" with the left mouse button, a window pops up. We are interested in the cells - small squares, if you hover the cursor on them, you get to choose the number of horizontal and vertical columns of the future table. See exactly how many columns are created, you can immediately. Everything is simple and intuitive. Plus, it takes a minimum of time. In the resulting label enter the necessary data. Note that the Word table, in contrast to the calculations does not, according to the formula does not calculate, therefore, for digital calculations is not to Word-y.
But there are cases when there are not enough cells. Then the number of columns in the table is set manually. Make it quite easy. We remain in the “Table” tab, only now we pay attention to the “Insert Table” line. Click on it with the left mouse button. In the opened window, we boldly write down the number of vertical columns and horizontal rows. Such manual prescription is irreplaceable, if the table has to be very large, because then there may be more than a dozen rows. It will look like this in Word:
Option 2. Draw - easy!
If you are still not used to looking for easy ways, then a computer mouse in your hands, we will draw a table with it. Still remain in the "Table", but this time select the row "Draw a table." When you click on it, a pencil appears on the document, which we will create. To make it work, hold down the left mouse button. Thus we draw the frame of the table, that is, create a rectangle or square, as you like. Inside the resulting base, then draw the line with the help of the same pencil. Naturally, the lines will be vertical and horizontal. Here it is important to observe the distance between the columns and the lines, since we ourselves draw, so the accuracy of the table depends on us. The work is painstaking, but worth it if you want your sign to be different from the others;)
Option 3. And a little more about Word 2013 tables ...
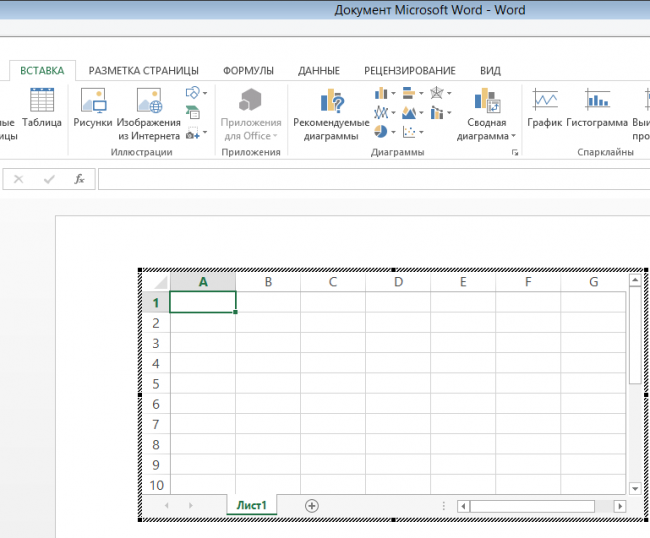
Before we finish, let's talk about several types of tables. Word gives us the opportunity to insert an Excel spreadsheet into a document, if necessary. To do this, in the drop-down tab “Table” select the row “ Excel spreadsheet ". The result of clicking the left mouse button will be the corresponding table in which you can already carry out all the important calculations. In this case, the top toolbar, if we click on a table cell, will change a little. This suggests that we started to work with Excel.
A nice addition from Word was the ability to make Express tables. Simply put, this is such a string all in the same “Table” menu, when clicked, it falls out ready tables with already written data. Let's say if you need a list of something, but you want to save time on writing it, you want the table to look presentable, then this item is for you. Here you only need to correct the numbers or words, but otherwise everything is very beautiful. We are also pleased with the presence in the Express tables of editable calendars.
PS
Now when we switched to "you" with Word tables , there is no doubt that any information will always look neat. And let everything be in their places not only in documents, but also in life.
How to create a table?