


- How to reinstall the network card and reset the settings in Windows 10
- NetAdapter — An Alternative Network Troubleshooting Method
- Reset adapter network settings in Windows 10
- Reset adapter settings in windows 7
- Reset windows 10 adapter wifi network settings
- Change Network Adapter Priorities in Windows 10
- The powershell way
- The interface method
If you have problems with the network or the Internet in Windows 10, then you should reinstall network card and reset the network settings to default values. Not sure how to do this? The new feature in Windows 10 will help you - automatically reinstall the drivers and reset the settings.
Network problems in Windows 10 is a fairly common topic. They do not always occur due to the fault operating system are often the cause wrong settings user or driver problems for a specific network card model.
How to reinstall the network card and reset the settings in Windows 10
If you want to solve problems yourself, Microsoft has made it easier for you. In Windows 10, a very useful feature appeared that allows you to automatically reinstall the driver of the network card, as well as reset the settings to default values.
If you have a problem with the connection, you can follow the steps below to reinstall the drivers and restore the factory settings of network components.
Go to the Start menu and click on the gear icon to enter the System Settings.
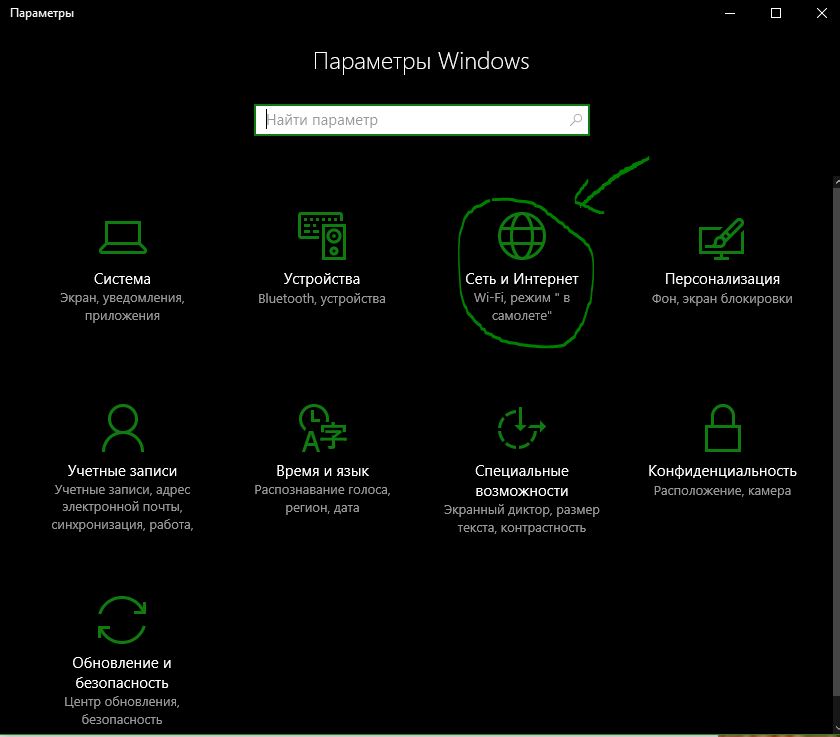
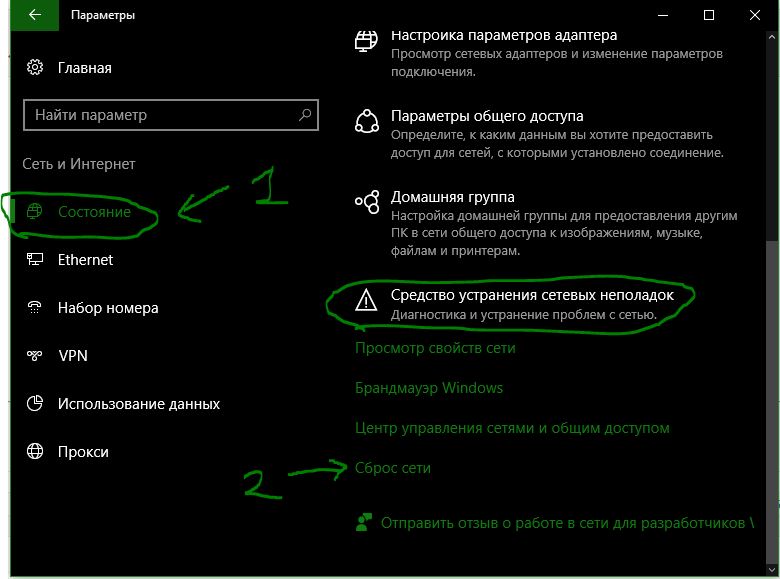
Then go to the “Network and Internet” section. On the Status tab, you can check your Internet connection. Here we are interested in two points, in particular - “Network Troubleshooter” and “Network Reset”.

To begin, use the first item before resetting to default settings. There is always a chance that after the first paragraph is completed, the problem will be solved and you will not need to reinstall the drivers.
After logging into Troubleshooting Tools, click Next to enable scanning for faults. If the troubleshooting tool finds any problems, it will immediately attempt to fix them automatically. It may be necessary to restart the computer after the restoration operation is completed.
If the above actions did not bring the desired result, then go to the second point to reset the settings and reinstall the components.
Go back to the Settings section, then “Network and Internet” - “Status”. This time, on the right, scroll down and select "Network Reset."
A message appears in the new window that this action will remove and reinstall all drivers on network devices, reset the settings (for example, you will need to re-enter the password to Wi-Fi networks ), and also returns all system components responsible for the network to the initial parameters. Confirm this procedure with the "Reset Now" button.
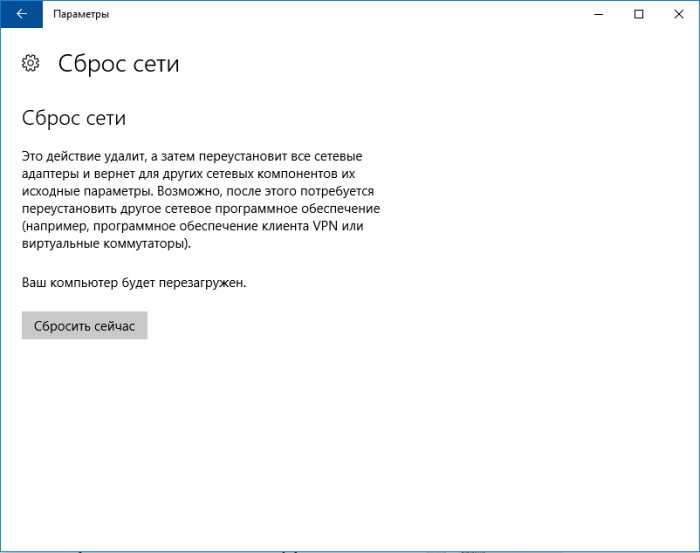
After performing a reset, restart the computer and check that everything is working now.
NetAdapter — An Alternative Network Troubleshooting Method
Basic network and Internet connection problems can often be solved. simple methods - it is enough to reinstall the drivers for the network card, change the DNS to the Google address, update the IP settings and similar operations. However, all these settings are scattered across Windows partitions . And if everything was in one place?
It was for this purpose that the NetAdapter utility was developed, which groups all the network troubleshooting tools in one window. That is, with one click you can perform the above operations and not only. However, this is not a tool that can magically solve absolutely all network problems, but given the nature of common problems, there is a high probability that the program will help you find the causes of network component problems and solve them.
The program must be run with administrator rights (right click of the mouse - run as Administrator). The right side of the program window contains information about the network card and connection - IP address, MAC address, current use of the DNS address, etc. On the left, in turn, are all the tools for configuring and diagnosing the network.
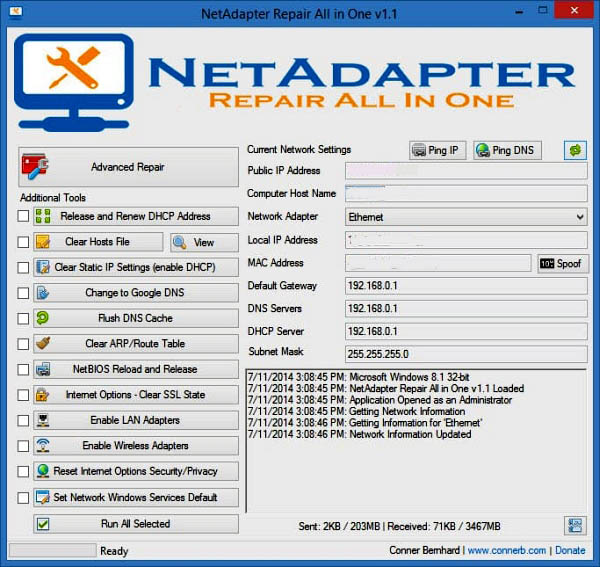
Among the tools available here is resetting the temporary DNS memory, changing the DNS addresses to Google (for example, it helps when the Internet connection is active and the pages do not open), cleaning hosts file (also view its contents), update IP, reset configuration and security settings, “reset” network settings restarting NetBIOS. You can also use spoofing to change the MAC address of a network adapter. To activate tasks (one or more), select them from the list, and then start using the button at the bottom of the window.
Additional tools (Advanced Repair Tools) are also available that allow you to troubleshoot problems related to the TCP / IP protocol, reset the Proxy / VPN settings, and also diagnose Windows Firewall. If you often have network problems, then NetAdapter Repair All in One will save you a lot of time.
Many have encountered problems with connecting to the Internet and the reason is sometimes lurking in cluttering up a network card. You can try to identify the cause: disconnect and reconnect, restart the router and computer, check whether other devices can connect to the Internet. Sometimes it helps to restart the computer when it works for a long time without restarting. For me personally, on a laptop, only one option helps is to reset the network settings.
Reset adapter network settings in Windows 10
- 1. Click on the tray notification.
- 2. "All parameters".
Select the "Network and Internet" option.
Go, "Status" and do "Reset Network." Next, windows will ask to restart the computer. You can try selecting "Network Troubleshooting Tool".
Reset adapter settings in windows 7
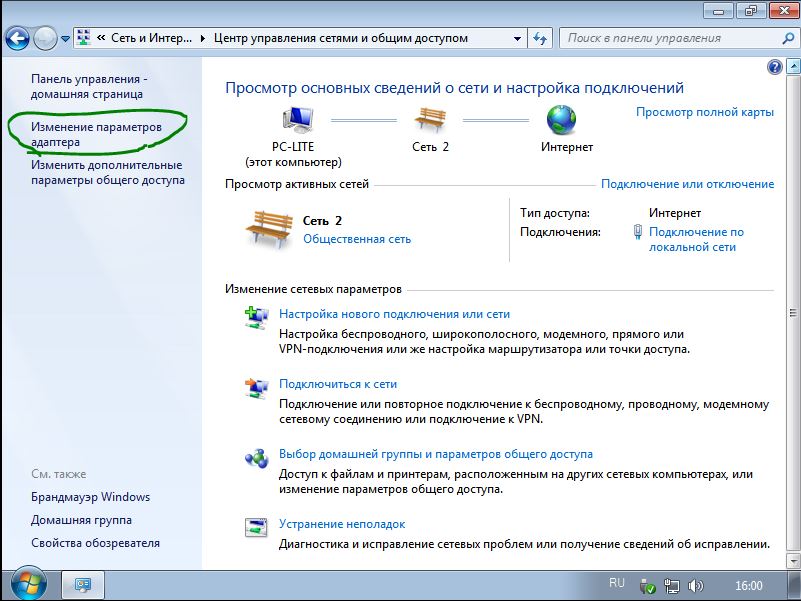
Start menu "control panel"> "network and internet"> "network control center"> "change adapter settings".
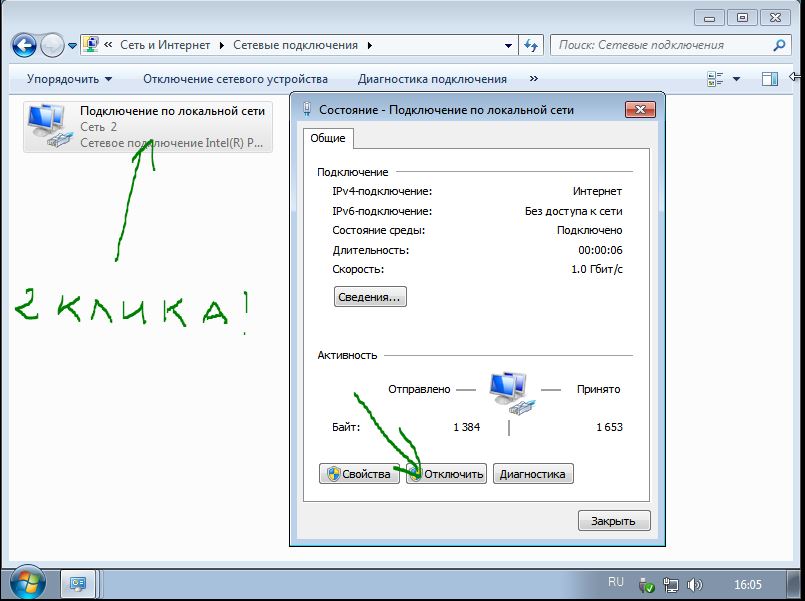
Open up necessary connection . In the opened window, turn it off and on again.
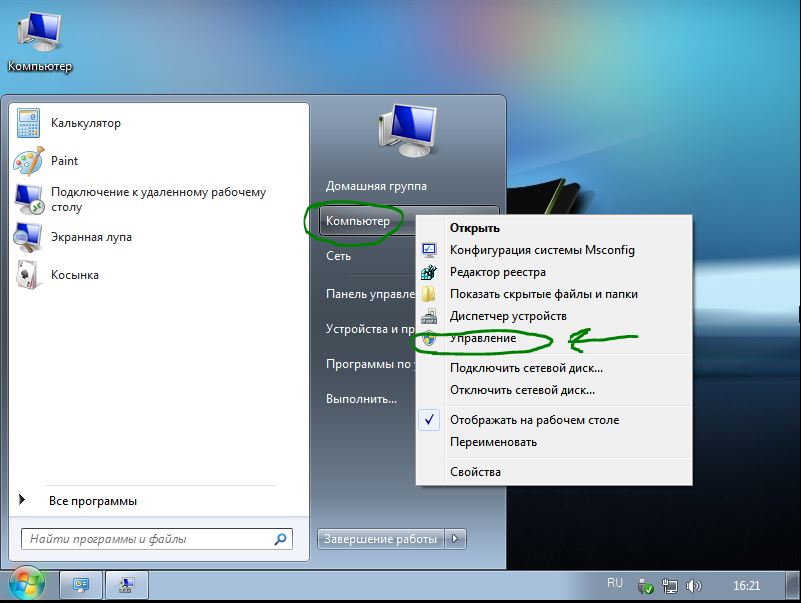
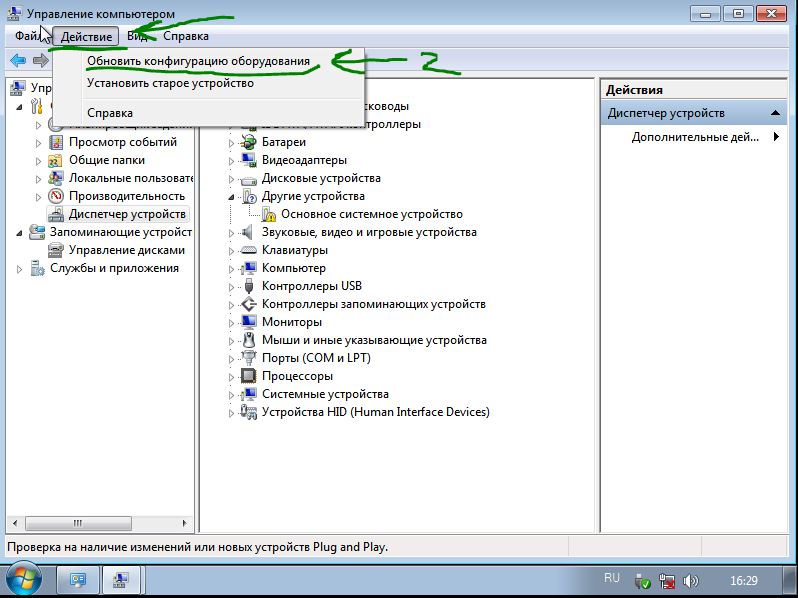
You can remove the driver for the network card if the above method did not help. Open the "start" menu, right-click on the "computer" line and click on "Control" in the pop-up menu.
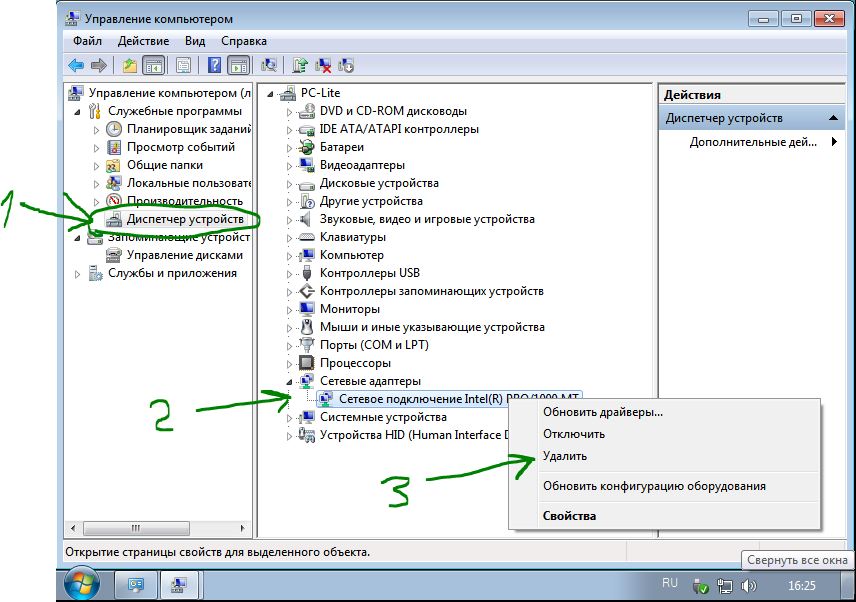
Now we need to install the driver back. To do this, click the "Action" tab and in the pop-up menu "Update hardware configuration." The driver will install itself. Check if the network adapter is turned on.
Reset windows 10 adapter wifi network settings
There is a problem with wifi connection adapter, the user can not connect to the Internet, although it enters all the data correctly. To get started, just restart your router (modem). If it does not help, then you need to delete the WiFi settings.
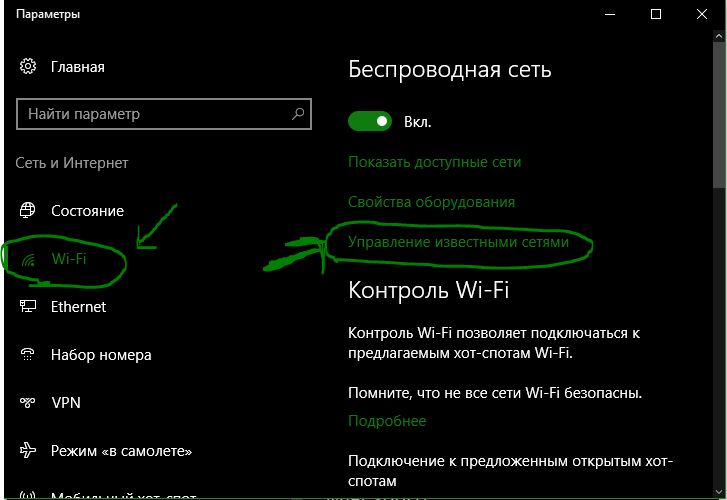
- In the Start menu, click on the gear icon to open the application settings.
- Click on "Network and Internet", then click on WiFi in the menu from the left.
- Click on the right "management known."
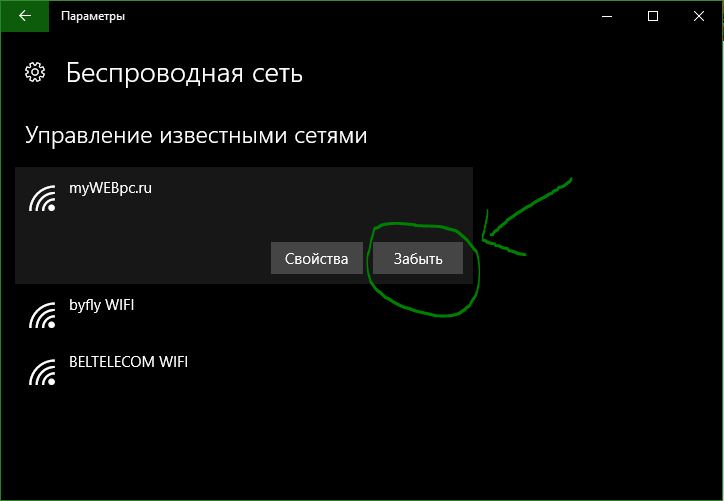
Select a connection and click forget.
If you use a wireless network connection, it uses a network connection, it’s a network connection and a Wi-Fi connection.
Note: The following guide is for Windows 10.
There are multiple options available for Windows 10. Sometimes though it may be necessary to prioritize a Windows adapter.
Consider, for wireless networking, wireless network connectivity, wireless networking, wireless VPN, and wireless networking.
Change Network Adapter Priorities in Windows 10
You can use either the PowerShell or the other.
I like PowerShell. So, lets start there.
The powershell way
First PowerShell prompt:
- Shapes and keystrokes Windows powershell link that is displayed.
This opens an elevated PowerShell prompt. Note that you can also run a typing powershell. The screenshot above shows how it’s done.
Get-NetIPInterface . This displays all network adapters, their interface index number, and the interface metric.
The adapter is a unique number of each adapter. Also, it lists all adapter windows at that point in time.
The interface column column. Priorities for all adapters.
Run the command Set-NetIPInterface -InterfaceIndex “-InterfaceMetric“ new priority of the adapter ”.
Example: Set-NetIPInterface -InterfaceIndex “11” -InterfaceMetric “90”
Adapter to the value 90.
Adapters with a lower InterfaceMetric number are prioritized over.
Use the command line to verify the change.
The interface method
If you prefer a graphical user interface, you can do that as well. This is a straightforward as the PowerShell method.
This is an overview of the network adapter.
For example, it’s recommended that you’ll choose it. I get you the PowerShell command Get-NetIPInterface to get a reading on those directly.
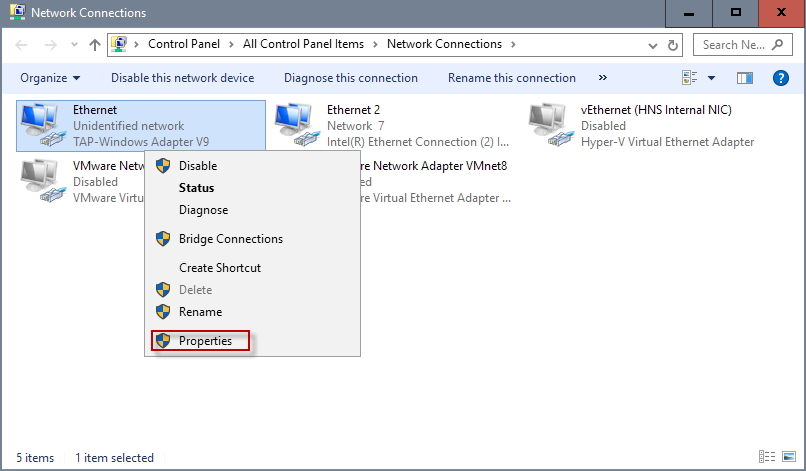
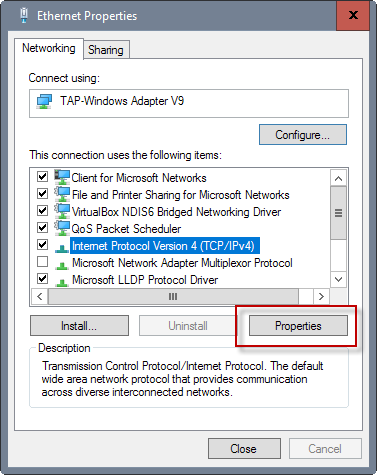
Step 1 : Tap on the Windows key, type ncpa.cpl and hit it. This opens the Network Connections listing.
Step 2 : Click the context menu. This opens the properties window of the adapter.
Step 3 : Locate Internet Protocol Version 4 (TCP / IPv4), select it, and click on the Properties button. Note: If your connection is IPv6, select Internet Protocol Version 6 (TCP / IPv6) instead.
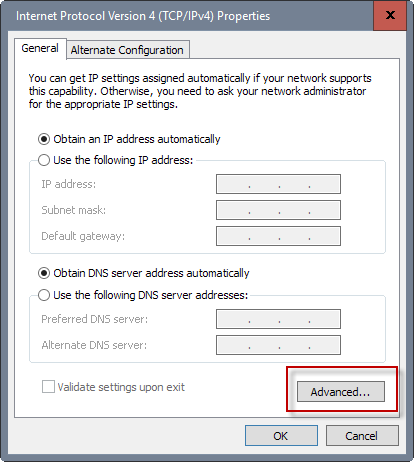
Step 4 : Locate the button.
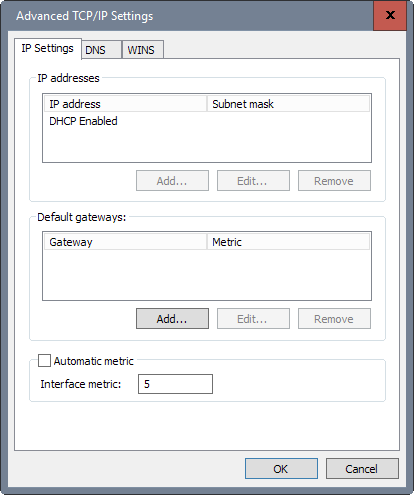
Step 5 : There you find Interface metric near the bottom. Remove the checkmark from the automatic metric box, and enter a new custom number. Make sure you select the value of 2 or higher, as it is reserved for the loopback adapter.
Step 6: Click here.
I use the PowerShell command used above.
Not sure how to do this?And if everything was in one place?