


- VHD files
- Create a virtual disk
- Virtual machine setup
- Create a virtual disk
- How to create a virtual hard drive
- Virtual disk mount
- Booting from a virtual machine
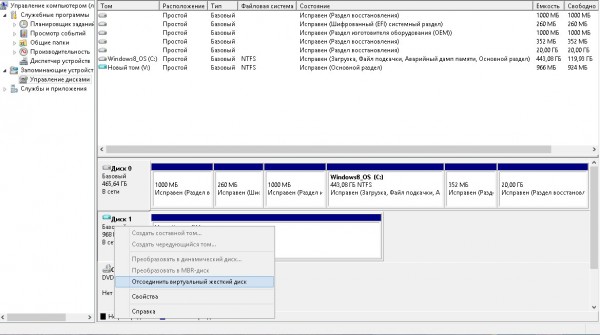
- Unmount a virtual disk
- How to remove a virtual hard drive
- PS
- Setting permissions: the administrator has no jokes!
- Encryption: these files are absolute tabs for you
- How to create and attach a virtual hard disk
- How to remove a virtual disk correctly
- Creating a disk for permanent storage of documents and files
- How to remove a virtual disk correctly
One of the features of Windows8.1 was the seriously improved work with virtual disks, support for which began with the previous version of the OS.
VHD files
Starting with Windows 7, VHD (VirtualHardDisk) format files first appeared. Unlike the familiar ISO image file, the VHD structure contains data about file system . Images are perceived by the system as separate disk partitions, even allowing you to load another system from them.
Alert when formatting virtual hard drives using a virtualized operating system. If you select the whole format, for the system it will be as if the data were copied, and therefore, all the space will be occupied. If you select an image, as soon as the virtual machine is created, it will start and the installation process of the image will begin.
It ends with a brief virtual machine configuration. If everything is correct, click Finish. The process of creating the virtual machine itself, wait. Right click on virtual machine , a context menu appears that allows us to connect to the virtual machine screen, change the configuration, create a snapshot, among other things.
Create a virtual disk
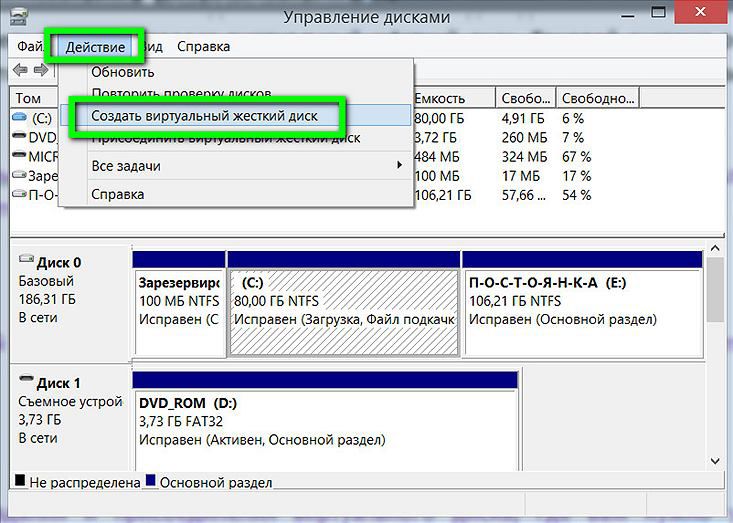
In Windows 8.1, a new virtual disk is created using the system utility. Open it, and select the appropriate item in the "Action" menu:
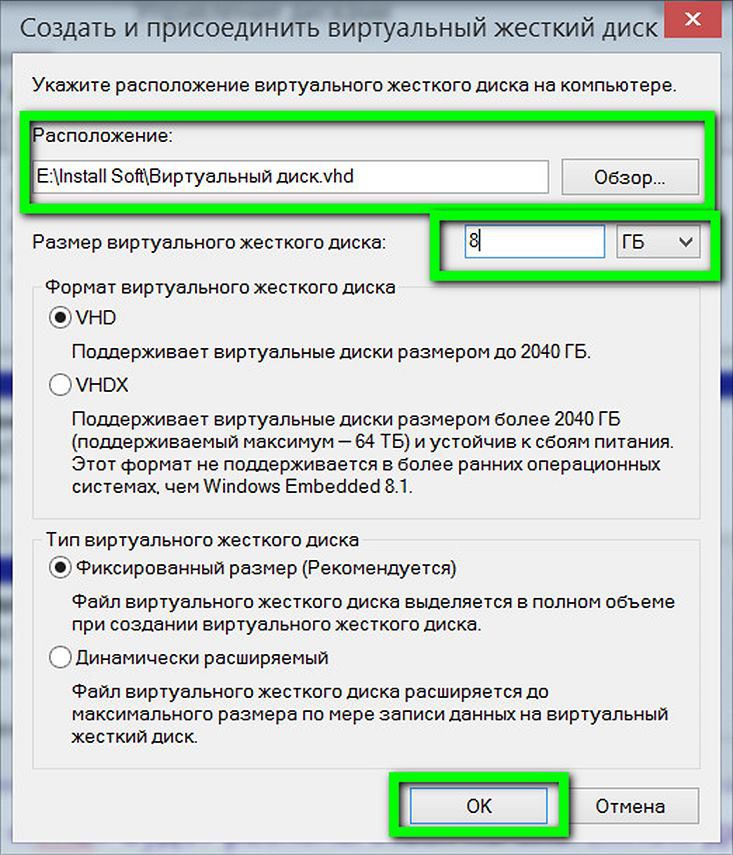
In the window that opens, enter the file name and its size. We take advantage of the new feature of the operating system, noting the VHDX format that supports virtual disks up to 64 Tb.
Virtual machine setup
Right-click on the virtual machine, click "Settings". You can also access actions from the right sidebar when choosing a virtual machine by clicking "Settings". We have HDD which belongs to the virtual machine, but you need to install the operating system.
Create a virtual disk
Click the Apply button to accept the changes. On the left side, select Network adapter . In the options on the right side, the virtual switch specified when creating the virtual machine was selected. From this section you can change as necessary.

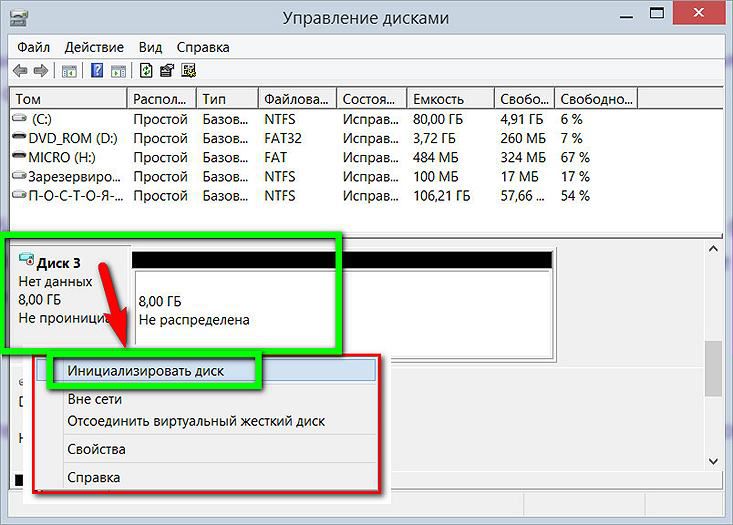
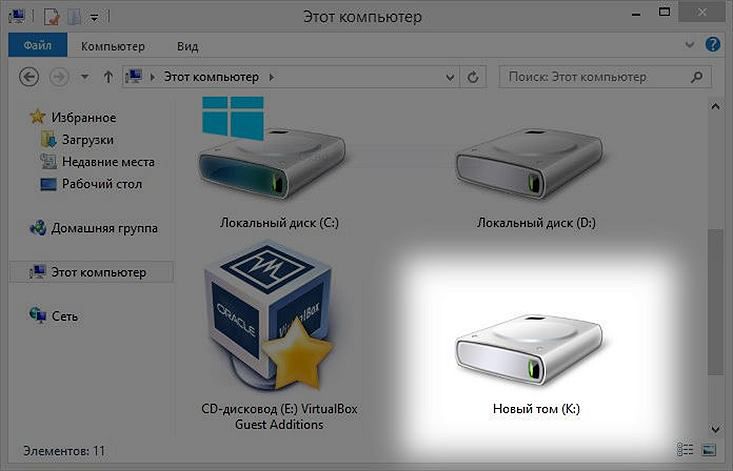
The disk appeared in the system, but it will need to be initialized.
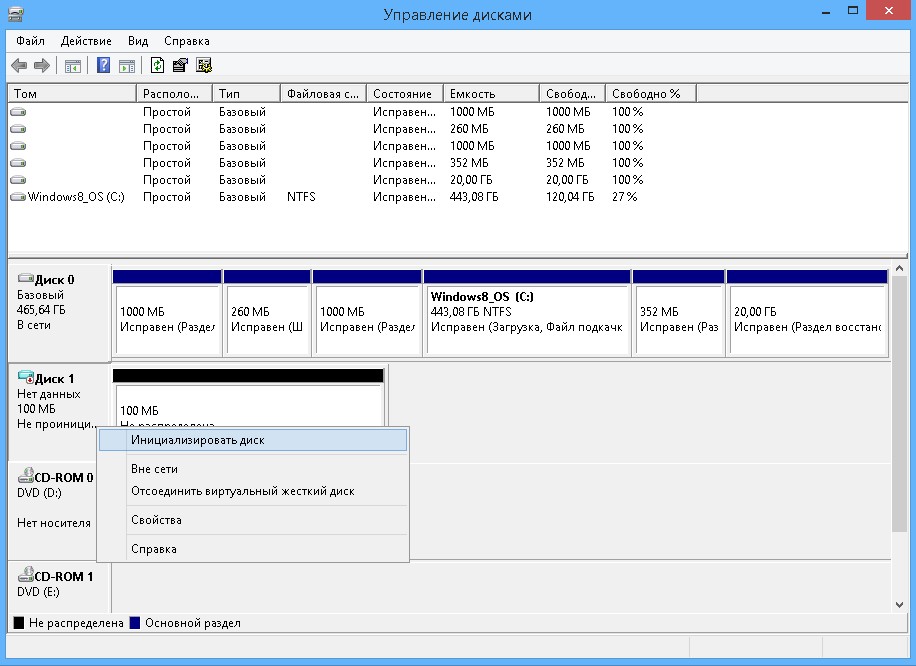
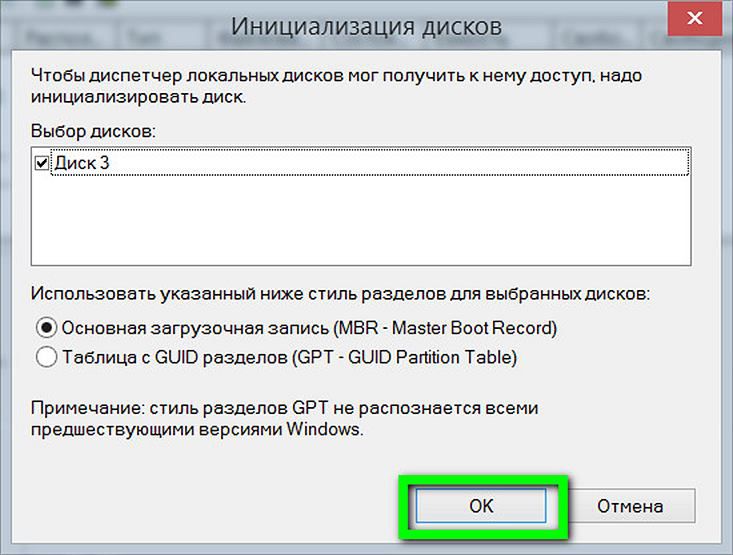
Since the VHDX format we have chosen is not compatible with previous OSes, feel free to choose a newer GPT.
Click OK to apply the changes that were made only on the virtual machine. The first time an operating system is to be installed, it will be interesting for us to see and interact with what is happening on the virtual machine. To do this, we need to "connect" to the virtual machine. Right-click on the virtual machine and click Connect.
A new window in black begins, which represents the screen of the virtual machine. It is black because it is off. A virtual machine begins by visualizing what it is doing or waiting in a connection window. You should now follow the installation procedure of the operating system that you want to install. At the moment, there is no difference between a physical or virtual environment.

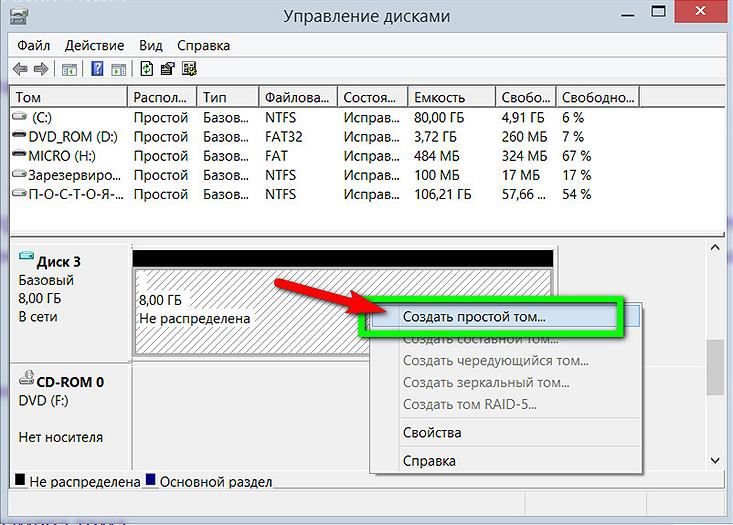
After initializing the disk, we observe it in the system. Now on it you need to create new section and format it.

The sequence of necessary actions has been described in detail in. After the end of the markup we get new disc in system.
Congratulations, you have your first virtual machine! You can share it in social networks . You can also leave your opinion, comment or suggestion. Thank! The new style is characterized by a careful and consistent presentation approach focused on content, new application features and a twist for tablet and touch platforms.
How to create a virtual hard drive
There are two possibilities for testing. Better use the hardware and experience.
- This version will allow us to conduct the test that we intend to do.
- When configuring a virtual machine, it is important to consider these parameters.
To do this, click "Create" in the main menu. You can link more memory if available on your computer. Create a new disk of this size by clicking the Create button. If the reader is used to other virtualization systems, you can choose a format that allows you to use them in these systems.

Virtual disk mount
In order to connect a disk that is automatically unmounted during shutdown and reboot, in the "Disk Management" select "Attach".

Booting from a virtual machine
Thus file hard drive will grow with maximum size. By default, it will be in the folder virtual disks virtual window settings in the "My Documents" section. Click Create to complete this phase. To start the virtual machine, just click "Start" in the main menu.
The first important window is the choice boot disk . Then we must click “Start” to begin the installation process. This version has only English installation, but allows regional settings in Portuguese. After selecting the settings, click “Next” to go to the next screen, and then “Install Now” to start the installation. Just click “Next” in this window. Wait, which may take several minutes. You can restart the virtual machine throughout the process.
Select the desired VHDX file and see how a new disk appeared in the system.

Unmount a virtual disk
To disable the virtual hard drive mounted in the system, we again go to the "Disk Management" utility. We right-click on the disk icon on the left. A menu appears in which we select the "Disconnect" item.
How to remove a virtual hard drive
When finished, click Next. Let's take the definition of express settings in this tutorial. Later in this series we will see how to configure the settings. Later you will receive an email in this account confirming the authorization of your computer. If you haven't account , you can use the options at the bottom of the screen to create a new one. Enter the country and contact number and click "Next". Upon completion of installation and configuration, our “start screen” replaces the old Start menu.
It has several steps and takes some time, but it is accessible to everyone. Drag the mouse over each of them to see what they find! We protect our account with a password, data antivirus, and that’s all for us. But what if more people use the computer? Of course, you can find them in older versions of the system, but mostly in higher versions. So, how quickly can you protect your computer from other home users and, possibly, from the outside world?
PS
With a virtual disk, you can perform any file operations. Traditionally, many prefer them for Reserve copy system and data. In addition, due to the additional structural features of virtual hard drives, additional operating systems can be installed on them, instructions can be found on the Web, but this procedure is rather complicated. WITH using windows 8.1 there is no need to work with VHD image files of such programs as VirtualPC and Hyper-V.
Setting permissions: the administrator has no jokes!
By default, the system can be practically accessible to all system administrators, administrators, and, of course, owners. When you use the computer only for yourself, you don’t have to worry about what if you share it with your family? All this has one hook - everything will be visible to the administrator. If you do not want the administrator of the family computer to access your profile, you will have to change the permissions on the selected folders. It can be only the selected "secret" folder or quietly the entire profile directory for which you will delete administrator access rights.
Outwardly, a hard disk cannot be distinguished from the usual partition of a computer disk. But, unlike the latter, virtual disk - This is a file of the “.vhd” format, which is physically located on this partition of the disk. After joining the system, the virtual disk can be seen in Windows Explorer and file managers as a regular disk partition. If, for example, you need a separate disk partition temporarily, so as not to waste time partitioning the hard disk with special software, it is easier to create a virtual disk. You can place user files and install programs on it, just like on a regular disk partition, but the process of creating a virtual disk is faster and easier than working with hard disk partitioning. If there is a need to hide some files from third parties, the display of the virtual hard disk can be turned off at any time.
Encryption: these files are absolute tabs for you
In addition, you can allow them to view the folder, but in no case display the contents of the files. When you include encryption in a folder or file, you can work with it as if it weren’t. When you install encryption on the image that you open in the editor, it decrypts it at run time, you need to modify it and encrypt it when saving it. Since you are the owner, you certainly do not enter a password.
In the first image, Germelin created a mischievous image that he wants to hide from the computer administrator. He encrypts it, and the other user does not open or copy it anywhere - he does not have access to it. The contents of such a file will not be visible to other computer users, but, of course, it’s not even a thief who steals your computer or receives it from another operating system. But if he steals your entire computer, including your system, he may not know your user password, otherwise everything is lost.
By connecting a virtual disk to a virtual machine created using a hypervisor, you can move large amounts of data from a physical computer to the latter.
Finally, a virtual disk can be used to install another operating system on it. If one is needed temporarily, for example, for testing, but there is no other need in a separate section of the disk, installation of the operating system can be done on a virtual disk. Below we will consider the process of creating a virtual disk. regular means Windows 8 (10).
There is one more question. What happens if you want to share an encrypted file with another user? The encrypted file will be available only to those who know this encrypted file in advance. Step by step instructions for sharing an encrypted file can be found in Czech help.
You create a virtual disk in the “Computer Management” utility, in “Disk Management” and in the “Action” menu. This terrible navigation was the most difficult, the rest is easy. You choose where to save the virtual disk file, what size it will be, whether fixed or dynamic, then create a partition and format it and connect it to the computer under the letter.
How to create and attach a virtual hard disk
To create virtual hard drive, call the Run command (for this you can use the Win + R hotkeys) and enter the command:
diskmgmt.msc
Click OK or press Enter.
The disk management utility will appear. In the "Action" menu, we need the command "Create a virtual hard disk".
Only one who knows the key receives data on the disks. After authorization, you can still fully work with the disk, and the data will be encrypted when writing and decrypting while reading. If you encrypt, copy, and work with data, this slows down a bit because the crypto surface just says a little. But this is not a disaster - the system is ready for such pieces.
Yes, this is not for everyone. Yes, if you don’t know what you are doing, don’t do it, because today the service is incredibly expensive. However, if you decide, it will end up with the whole system partition being encrypted, and the data for the bootloader and decryption will be moved to the backup unencrypted partition, respectively.
In the window that appears, specify the folder on the non-system partition of the disk where the file of the “.vhd” format will be stored - in fact, the file of the virtual disk. We name this file, select the type (fixed or dynamic) and determine the size of the virtual disk. If we are talking about creating a virtual disk on the system partition of the computer’s disk, it is better to choose a fixed size and limit it to avoid cluttering the system disk in the future. It may happen that an expandable dynamic virtual disk "grows" in volume, which will lead to reduced system performance due to lack of space for Windows tasks. Having set all the parameters, click OK.
How to remove a virtual disk correctly
Then you can add this protection software through various system systems to your computer. Are you using advanced security or are you using a computer with a default setting? Share your opinion in the discussion of the article.
Why is this good and how can we use this tool to optimize your computer? In the article. operating system , applications and programs create temporary files that are stored on the computer’s hard drive. Then these files take up unnecessarily space. We can solve the problem using various disk cleaning tools.
After that, we return to the disk management utility window, and the newly created virtual hard disk will be defined as unallocated space. The virtual disk must be initialized to interact with the system. After that, it will be visible in Windows Explorer. Of the other sections of the computer’s disk, the newly created virtual disk is most easily determined by its volume. In our case, in the disk management utility it appears as “Disk 3”. On this inscription, right-click and select "Initialize Disk."
Creating a disk for permanent storage of documents and files
Here we can configure the corresponding directory on the virtual disk, and temporary files will be saved in this place. In this case, the data is stored in files representing images of the respective disks. Therefore, you must first create a disk image. To do this, we offer a menu in the "System Tray: Disk Image - Create Image" window. Here we can enter the file name, select the disk size and the desired file system.
In this case, you must assign the file to the created disk to represent its image. Using other parameters, we can configure the drive as a removable storage device, hard drive or access to the drive only from the current account. If the image is formatted, the file system can no longer be modified when creating a virtual disk.
In the next window, in most cases, you must leave the predefined parameter of the main boot label MBR. Click OK.
Back to the disk management utility again. Now you need to arrange the virtual disk in a separate volume. We call the context menu, but already on the visual display of unallocated space. We select the first command - “Create a simple volume”.
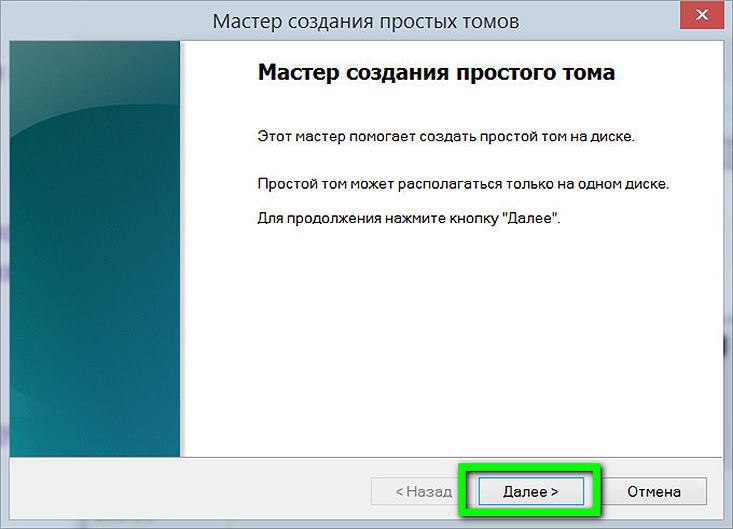
Then what we need is to follow the instructions of the wizard to create a simple volume.

Assign the letter of the Latin alphabet to display the disk in Windows Explorer and file managers. Click "Next."

We leave the predefined formatting option for our virtual disk in the NTFS file system. Click "Next."

All - click "Finish."

After that, the virtual hard disk can be seen in Windows Explorer as a separate disk partition.
How to remove a virtual disk correctly
To delete a virtual disk, you must delete its “.vhd” file, respectively. But first, we will disconnect the virtual disk from the system so that it does not appear in Windows Explorer. In the disk management utility, select our virtual disk, right-click and press the disconnect command.
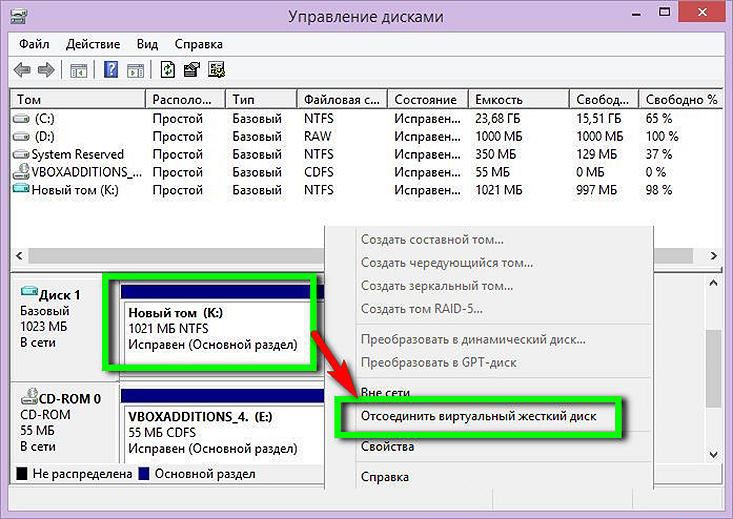
Next, we will see a small window that will warn us against the possible loss of data that is on the virtual disk. If all the important data from the virtual disk is moved to the right place, feel free to click “OK”.

That's it - now all that remains is to delete the “.vhd” file from the usual disk partition where it is physically located.
But what if more people use the computer?So, how quickly can you protect your computer from other home users and, possibly, from the outside world?
When you use the computer only for yourself, you don’t have to worry about what if you share it with your family?
What happens if you want to share an encrypted file with another user?
Are you using advanced security or are you using a computer with a default setting?
Why is this good and how can we use this tool to optimize your computer?